Pentair · IntelliValve
Pentair IntelliValve
Pentair's push-button valve actuator: setting its two end points, what the LEDs mean, wiring it to the panel, and the blink codes for a stuck valve.
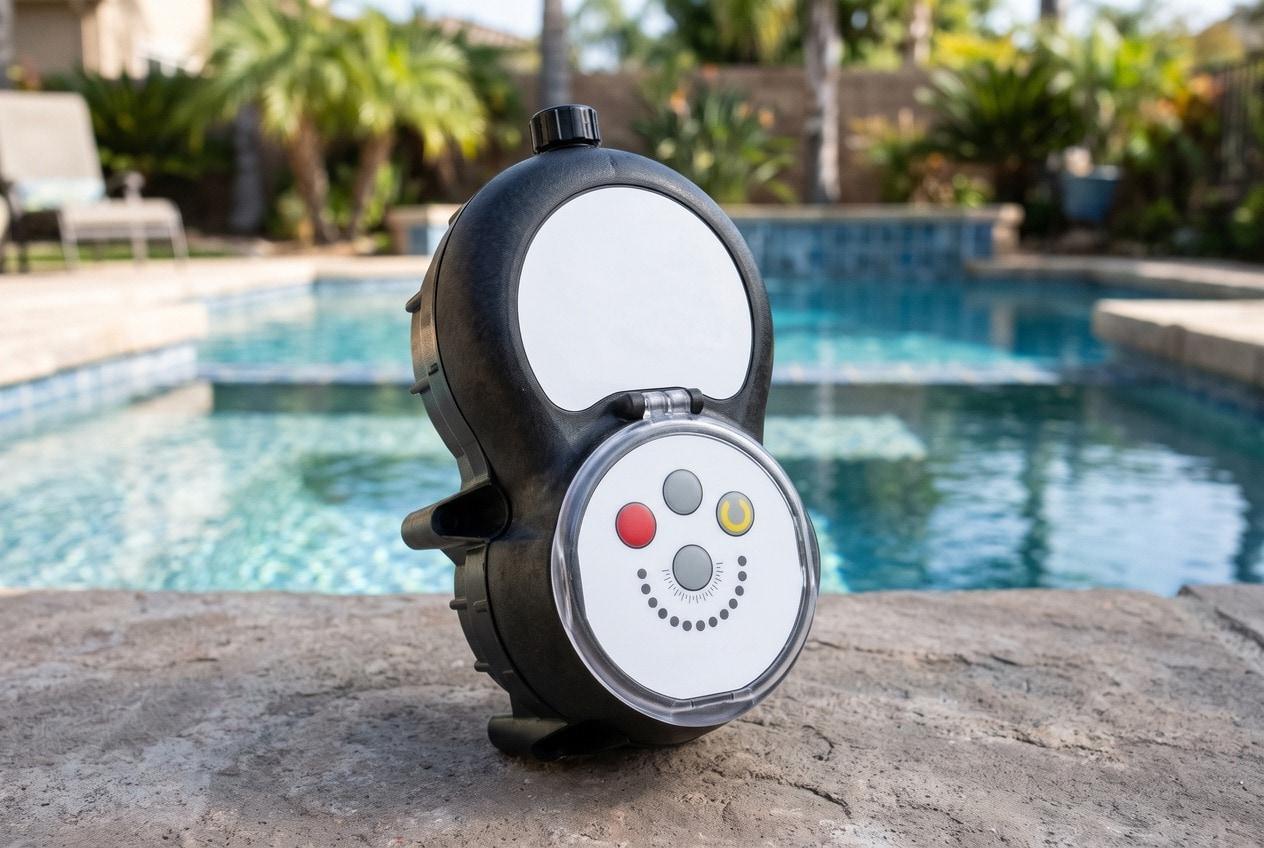
The IntelliValve is Pentair's valve actuator: the motor that bolts onto a diverter valve and turns it when the automation panel tells it to. It fits Pentair, Compool, Ortega and Jandy diverter valves, 2-way, 3-way or 3-way Y, from 1.5 to 3 inches, and runs on 24 volts AC like any standard actuator. Pentair's IntelliCenter pool and spa systems come with two. Pool valve actuators covers how a standard actuator works.
What's different is how you set where it stops. A standard actuator has two cams inside, set by hand, that stop the valve at each end. The IntelliValve has no cams. You set its two end points with buttons on its face, and a ring of LEDs shows where the valve is. It can stop at 46 positions across a 180-degree swing, about every 3.75 degrees.
Pentair counts the LEDs two ways. The product page, the catalog and the sell sheet say 13 LEDs, which matches the numbers printed on the face, 0 to 24 in steps of 2. The manual says the 46 positions are shown by 24 position LEDs.
Fitting it to a valve
The manual's steps, on a valve with no actuator:
- Unscrew and remove the valve's knob and handle.
- Take out the four screws from the valve's top cover. Arrows molded into the cover point to them.
- Line up the actuator's splined shaft over the valve's shaft. A square notch in the spline marks where the diverter is, and the actuator ships set to end point 0. There's silicone on the actuator's underside, so keep it off the bottom of the actuator as you fit it.
- If the holes don't line up, turn the actuator, still on the valve, until they do.
- Fasten it with the four 2-1/4-inch screws supplied. Don't tighten them too far.
To replace an old actuator, switch off the power at the breaker, unplug the old actuator from the panel, take off its knob and handle, take out its four screws, and lift it off. Then fit the IntelliValve the same way.
Don't fit it where it could close off the pump. The manual warns, in capitals, that an IntelliValve mounted so it can block the pump's suction or return line will damage the pump permanently. Check what each end point does before the pump runs on automation.
Wiring it to the panel
The actuator has a 20-foot cable with a 3-pin plug, which goes into a valve socket on the control board.
On EasyTouch and IntelliTouch, the manual says the panel runs up to four actuators. Two sockets are for the pool and spa intake and return valves, and Valve A and Valve B are for anything else: solar, a water feature, an in-floor cleaner. On IntelliTouch, the valve module expansion board, 520285, adds Valve C, D and E. Route the cable up through the load center's 1-inch grommet and the low-voltage raceway, and coil any extra in the raceway's left-side compartment, not the upper low-voltage compartment.
On IntelliCenter, the IntelliCenter page covers the valve outputs, and Pentair's valve expansion module, 522038Z, adds six more.
The cable's green and yellow wires do nothing yet. The manual says they're reserved for future automation systems.
Modes, end points and home
The MODE button steps through the modes, and a colored light shows which one it's in:
- AUTO, green: normal running. The panel moves the valve.
- OFF, red: the actuator is disabled. Hold SAVE from AUTO or SERVICE until the light turns red, and hold it again to come back.
- SET, blue: for setting the end points.
- SERVICE, yellow: move the valve by hand with the arrow buttons, anywhere from 0 to 24. Nothing you do here is kept.
Setting the end points. It ships with them at 0 and 24, with 0 as home, the end where the valve normally sits. To change them:
- Press MODE until the blue SET light is on.
- With the red or yellow arrow, move to the first end point, the one nearer 0, and press SAVE.
- Move to the second, nearer 24, and press SAVE. The LEDs along the path flash five times, and it switches to SERVICE.
- Press MODE once to go to AUTO. The valve goes to home.
Only two end points can be set. To swap home to the other end, press the red and yellow arrows together while it's in AUTO. That does the job of the ON1 and ON2 toggle on a standard actuator.
Reading the LEDs
On a 3-way valve, the manual's drawings show:
- 0: the left outlet shut off completely.
- 12: both outlets open.
- 24: the right outlet shut off completely.
Positions in between restrict one outlet partly. The manual's example is a spillway: set the end points at 6 and 24, and the valve sits at 6, sending a little water over the spillway, until the panel moves it to 24 for full flow. Its drawings for 2-way and 3-way Y valves map the positions differently, so check the page for your valve.
When it won't move
The manual's troubleshooting:
- It doesn't turn when the panel calls for it: check it's in AUTO.
- It didn't move, or went back where it was: both end points have to be set. With only one, it reverts.
- It stops at the wrong end: swap home with both arrows, in AUTO.
- Stuck, with the power light blinking red and green and the service light on: press MODE, and it should go back to normal.
Its other lights: blinking LEDs mean the valve is stuck, and two LEDs lit on the dial show the move it was trying to make. A blinking red light means it failed to advance, and alternating red and green means its motor turned the wrong way. A blinking blue light means its bootloader is running, and a blinking LED on the dial shows its firmware version.
It isn't built for constant movement. The manual says it's not designed for jobs that keep the valve turning for long periods, such as a water feature that moves the diverter continuously.
Pentair's automatic heater bypass kit uses an IntelliValve on the heater's inlet. The Max-E-Therm page covers that kit.
Where you buy it
The IntelliValve is on Pentair's TradeGrade list, sold through pool stores, builders and service companies. The warranty is one year, on Pentair's row for automation equipment.
Which model do you have?
The model number is on the valve actuator label. Everything else in the range is shared — these are the parts that change with it.
| Model | SKU | Valves | Power |
|---|---|---|---|
| IntelliValve valve actuator | 521485 | 1.5 to 3 in. | 24 VAC, 750 mA |
Note on IntelliValve valve actuator: The only number. Pentair's TradeGrade list includes it, so it's sold through dealers. Pentair's IntelliCenter pool and spa systems come with two. | |||
Pentair IntelliValve parts, and what goes wrong
Read off the manufacturer’s parts list and checked before it ships. Open a row for what a bad one actually does — or start from the symptom and work down, which is the cheaper order.
What is it doing?
Pentair publishes no parts for it: it's a sealed unit, and the whole actuator is replaced. Before you replace it, work through the manual's troubleshooting. Check it's in AUTO mode. If it won't move or goes back to where it was, set both end points again, because with only one set it reverts. If it's stuck, with the power LED blinking red and green and the service LED on, press MODE to bring it back.
Adds six actuator ports to an IntelliCenter system, on the main load center, per Pentair's 2025-2026 catalog. The IntelliCenter page has the system's own valve outputs.
Adds three valve outputs, Valve C, D and E, to an IntelliTouch system, on top of the intake, return, Valve A and Valve B sockets. It attaches to the edge of the IntelliTouch personality board, and Pentair's IntelliTouch valve actuator guide, P/N 520294, covers fitting it.
Pentair IntelliValve manuals and documentation
Hosted by the manufacturer. These open on Pentair’s own servers, so they stay current.
- IntelliValve 2-way, 3-way valve actuator installation and user's guide (P/N 522301 Rev. E, 2024)manual
- IntelliValve product page: 521485, dealer onlyspec
- IntelliValve sell sheet (PDF 2020)spec
- Pentair Pool 2025-2026 product catalog, automation: the IntelliValve on page 22, with the IntelliCenter systems and expansion modulespec
- Pentair TradeGrade SKU list (policy effective October 1, 2019)spec
- Pentair pool and spa equipment warranty informationspec
Pentair IntelliValve warranty
1 year parts, Included when bought from a dealer and professionally installed labor
One year. Pentair's warranty table doesn't name the IntelliValve. Its row for all automation equipment, except the IntelliCenter upgrade kit and the SunTouch and SolarTouch systems, gives one year. The actuator is on Pentair's TradeGrade list, sold through stores, builders and service companies, and Pentair's warranty page gives anything bought online, including from an authorized online reseller, one year, parts only.
Manufacturer’s termsPentair IntelliValve parts
Pentair publishes no parts list for the IntelliValve. Its product page calls it a sealed, maintenance-free design, and neither its manual nor Pentair's 2025-2026 parts catalog lists a part inside it. When it fails, the whole actuator, 521485, is replaced. The parts above are the ones that go with it: the actuator itself, and the expansion boards that add valve ports to the panel.