Jandy · DEV
Jandy DEV D.E. Filter
Jandy's vertical grid D.E. filter: the powder each size takes, two maximum flows depending which document you read, and the clamp gap that decides if it's safe.
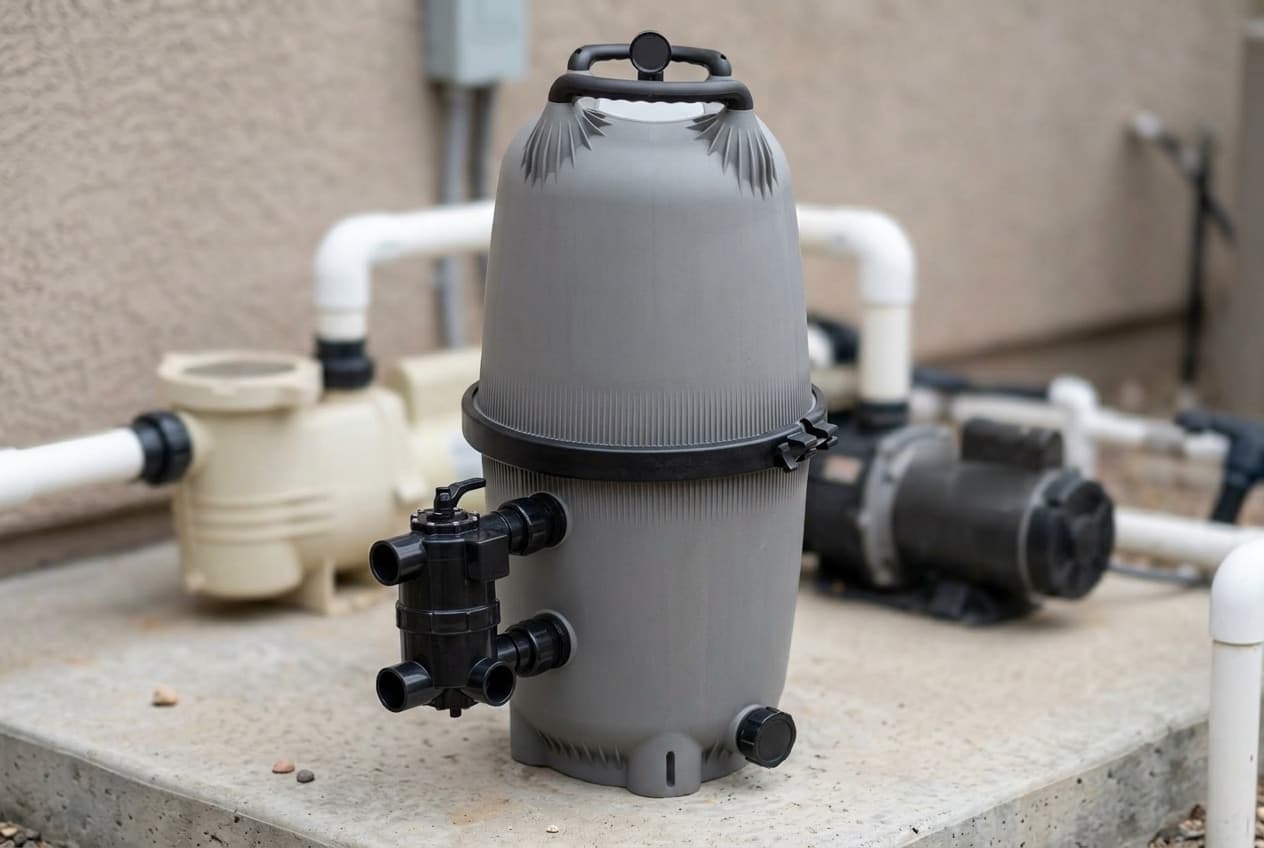
The DEV is Jandy's D.E. filter: a composite tank split by a band clamp, holding eight vertical grids that a coat of diatomaceous earth does the filtering on. It comes in 48 and 60 square feet, the DEV48 and DEV60, which replaced Jandy's DEL filters. Jandy says it traps particles down to 5 microns. Like Jandy's sand filters, it has no valve of its own.
Choosing a size, and the flow question
Both sizes share a 2.00 GPM per square foot design rate and a 25-inch footprint. The DEV60 stands 6 inches taller and takes a pound more D.E.
Maximum flow depends on the document. Jandy's product page, brochure, spec sheet and Fluidra's catalog give 96 GPM for the DEV48 and 120 GPM for the DEV60, which is the design rate times the area. The manual gives those same figures as the commercial limits and allows 120 and 150 GPM for residential use. The design rate is what the six-hour capacities are worked from: 34,560 and 43,200 gallons.
Leave room above it. Lifting the grid assembly out takes 57 inches of vertical clearance on the DEV48 and 71 on the DEV60, per Fluidra's catalog.
Choosing a valve
The DEV's ports are 8 inches apart, and Jandy's brochure lists three valves for it:
- Multiport valve, BWVL-MPV-80.
- Slide valve, BWVL-SLD.
- 2-in-1 Never Lube valve, BWVL-NVL.
These are the 8-inch versions. Jandy's SFSM sand filters take different, 7.5-inch valves.
Where it goes
- A well-drained spot that doesn't flood, never damp or unventilated. Protect it from the weather.
- On a firm, level surface, never leveled with sand, which washes away. Jandy says a loaded filter system can weigh up to 800 pounds.
- Electrical controls at least 5 feet away, so you can stand clear at start-up.
- At least 6 inches of clearance around it, to see the clamp ring.
- Air release and drainage pointed somewhere safe.
- Above the pool's water level: up to 2.5 feet without hurting pump efficiency, with a check valve on the pump's suction line.
- Below the pool's water level: isolation valves on the suction and return lines.
- Anchored where codes require it, as Florida's do, with Jandy's anchor bracket kit, R0465500. Screws aren't included; Jandy recommends 1/4 x 2 1/4 in. stainless Tapcon screws in 5/32 in. holes, one per bracket, not over-torqued.
Don't move the tank without its shipping screw in place, or the grids can be damaged. Take the screw out once it's on the pad.
Plumbing it
- Use 2-inch pipe at minimum, with as few fittings as possible.
- Connect with the unions supplied, assembled dry and hand-tight. No Teflon tape or pipe dope on the unions, and no pipe joint compound, glue or solvent on the union nuts. Silicone lubricant on the o-rings only.
- Support the pipes so they don't strain the valve.
- Fit an ASME-approved pressure relief valve or regulator if there's any doubt about the pressure the system will see.
- Don't include the filter in a piping pressure test if you can avoid it. If you can't: no more than 35 psi, water no warmer than 100°F, all air out first, and no longer than 24 hours.
The gauge assembly: put the smaller, thicker o-ring on the tank adapter's threads and screw the adapter into the tank through the coupling nut, snug, but don't overtighten it. Put the larger, thinner o-ring on the gauge housing and thread it into the coupler. Then orient the gauge, and hand-tighten the locknut only; a wrench can damage it.
The clamp
- Clean the o-ring seat, check the o-ring is in place on the lower tank half, and press the lid on.
- Fit the clamp over both tank flanges, bring its ends together, and seat the T-nut and threaded rod the right way round.
- Tighten with a 9/16-inch socket until the clamp ring halves touch, or are within 1/16 inch. Don't overtighten, because the clamp can break.
- If it won't close that far, don't run the filter. Call a technician.
- Recheck the clamp after the first week, then at least once a month.
Starting it up and coating the grids
- Set the valve to Filter, and prime the pump by filling its basket.
- Open the air release valve fully by turning the knob on the back of the gauge assembly counterclockwise, without removing it. Open any isolation valves and check the drain plug is in.
- Stand clear, never within 5 feet, and start the pump. When a steady stream of water comes out of the air release, close it.
- Coat the grids, on a new filter and after every backwash. Mix 5 lb of D.E. for a DEV48 or 6 lb for a DEV60 with water in a bucket into a thin, milky slurry. With the pump running and the skimmer valve open, pour it slowly into the skimmer basket.
- Watch the gauge. The pressure must stay under 50 psi.
- Once it settles, turn the gauge bezel so the Clean arrow lines up with the needle.
Never run the filter more than three minutes without D.E. The D.E. does the filtering, and the grid cloth only holds it; running bare damages the grids. Too much D.E. clogs the system, so use the amount Jandy gives. The dust irritates the eyes and lungs.
Backwashing
When the needle reaches the Dirty arrow, 10 to 12 psi above the starting pressure, it's time.
- Pump off. Set the valve to Backwash.
- Open the air release, stand clear, and start the pump.
- Close the air release once a steady stream of water comes out.
- Run until the backwash water is clear, repeating if needed.
- Pump off, and coat the grids again with fresh D.E.
Each backwash sends 100 gallons or more to waste, so check local rules on where it can go. The valve's Rinse position, where it has one, flushes dirt from the valve after a backwash.
Cleaning and replacing the grids
Inspect the grids at least twice a year, and clear out anything backwashing left behind.
To take the filter apart: backwash, then turn the pump off at the breaker and open the air release fully. Close the isolation valves, remove the drain plug and let the tank drain. Take off the clamp and lid, check the tank o-ring, and lift the grid assembly out by the handles molded into the manifold. Rinse the tank and refit the drain plug.
To separate the grids: unscrew the tie rod knob in the center of the manifold and lift the manifold off. Take off the top spacer, and lift the grids off the support. Check the o-ring at the top of the outlet tube. To reassemble, set the seven full-size grids and the short span on the bottom plate, hold them with the top spacer, and seat the manifold so the grids and outlet tube fit into it and the rod comes up through its center. Tighten the knob until the assembly is snug, but don't overtighten it.
With water: hose every grid surface clean.
With acid, for grid fabric stiffened by mineral deposits: check first whether a local pool store or service company offers grid descaling. Otherwise, soak the grids in a plastic tub of 6 parts water to 1 part muriatic acid for at least 4 hours, then rinse them thoroughly. Wear rubber gloves and eye protection, and add acid to water, never water to acid.
Winterizing
Turn the pump and breakers off. Open the air release, and set the diverter valve handle between two ports so air reaches all of them. Take the drain plug out and leave it out until spring, stored somewhere safe. Drain all the piping, and cover the equipment with a tarp or plastic sheet.
When it isn't filtering properly
Jandy's troubleshooting table, condensed:
- Water not clear: low sanitizer, water chemistry off, heavy bather or dirt load, too little run time, a dirty filter, or a hole in a grid.
- Low flow: dirty skimmer or pump baskets, an air leak on the pump's suction side, a blocked line or partly closed valve, grids that need cleaning or replacing, a low pool level, an unprimed pump, blocked impeller vanes, or low voltage.
- Short filter cycles: algae, water chemistry including TDS, missing or broken strainer baskets, a pump that outruns the filter's design flow, or ineffective cleaning.
- High pressure at start-up: small eyeball fittings in the returns, a partly closed return valve, a pump too big for the filter, or dirty grids.
- Dirt coming back into the pool: a hole in the grid fabric, a worn o-ring inside the filter, or a cracked manifold.
Warranty and where to buy
One year, parts only. Jandy's warranty doesn't cover a filter bought online, though replacement grids and parts bought online are, and it requires installation and service by a licensed pool contractor where one is required, or an experienced pool professional. Buy from a pool dealer and keep the receipt. The manual says water above 105°F voids it.
Where Jandy's documents disagree, or are unclear
- Maximum flow. The product page, brochure, spec sheet and catalog give 96 and 120 GPM. The manual gives those as commercial limits and 120 and 150 GPM for residential use.
- Another filter's drawings. The manual's dimension drawing labels the ports "CV inlet" and "CL inlet", with a note about a port "on CV model only", which are Jandy's cartridge filters. Its grid arrangement drawing labels the grids "DEL", the filter the DEV replaced.
- The brochure's specification table. Its labels are shifted a row: it lists "Max Working Pressure" as 34,560 and 43,200 gallons and "D.E. Required" as 50 psi.
- Port spacing. The manual, brochure, product page and catalog say 8 inches between inlet and outlet. The 2011 spec sheet says 8 1/2.
- D.E. in kilograms. The manual gives the DEV48's 5 lb as 2.0 kg; 5 lb is about 2.3 kg. Jandy also measures the charge in 1-lb coffee cans of loose D.E.: ten for the DEV48's 5 lb, which puts about half a pound in each can.
- The DEV60's outlet tube. The manual gives the DEV60 its own outlet tube assembly, R0358100. Fluidra's 2026 catalog lists only R0555100, the DEV48's number, and adds a separate outlet tube o-ring the manual doesn't list.
- Page references. The manual sends you to a parts list "on page 15" and a troubleshooting guide "on page 14". They're on pages 13 and 12.
Which model do you have?
The model number is on the filter label. Everything else in the range is shared — these are the parts that change with it.
| Model | SKU | Filter area | Max flow | D.E. per charge | Height | Clearance to lift the grids out | Shipping weight | Full-size grid, 7 required | Short span grid | Complete grid set | Tank lid | Tie rod | Note |
|---|---|---|---|---|---|---|---|---|---|---|---|---|---|
| DEV48, 48 sq. ft. | DEV48 | 48 sq. ft. | 96 GPM; 120 GPM residential per the manual | 5.0 lb | 41 in. | 57 in. | 95 lb | R0555000 | R0554900 | R0442700 | R0554700 | R0554800 | The smaller of the two. It supersedes the DEL48, and Fluidra's complete grid assembly for it, R0501300, is listed for both. |
| DEV60, 60 sq. ft. | DEV60 | 60 sq. ft. | 120 GPM; 150 GPM residential per the manual | 6.0 lb | 47 in. | 71 in. | 101 lb | R0359100 | R0359200 | R0442600 | R0357300 | R0359300 | Supersedes the DEL60. Same 25 in. footprint as the DEV48, 6 in. taller. |
Jandy DEV D.E. Filter parts, and what goes wrong
Read off the manufacturer’s parts list and checked before it ships. Open a row for what a bad one actually does — or start from the symptom and work down, which is the cheaper order.
What is it doing?
A hole in the grid fabric is Jandy's cause for dirt returning to the pool, and a hole in the element is one of its causes for cloudy water; either way the fix is a new grid. Grids that need cleaning or replacing are also on its list for low flow and high start-up pressure. A DEV48 takes seven full-size grids and one short span, R0554900. The DEV60's are R0359100 and R0359200. A complete set is R0442700 for the DEV48 and R0442600 for the DEV60. Running the filter more than three minutes without D.E. damages the grids.
Live pricing arrives when the retailer programs are approved.
A cracked manifold is the third cause in Jandy's troubleshooting table for dirt returning to the pool, after a torn grid and a worn o-ring, and the fix is a new manifold assembly. It sits on top of the grids, held by the tie rod knob. To take it off, unscrew the knob in its center and lift it off the grids and the outlet tube.
Live pricing arrives when the retailer programs are approved.
A worn o-ring seal inside the filter lets dirt back into the pool, per Jandy's troubleshooting table. With the grids out, inspect the o-ring at the top of the outlet tube for cracks or wear. Fluidra's catalog lists that o-ring alone as R0792000, and says this kit excludes the tank o-ring, R0357800.
Live pricing arrives when the retailer programs are approved.
Every time the lid comes off, Jandy says to inspect the tank o-ring for cracks or tears and replace it if needed. Before refitting the lid, the o-ring seat must be clean and the o-ring in position in the lower tank half, so the lid sandwiches it between the two.
Live pricing arrives when the retailer programs are approved.
Tighten the clamp's nut with a 9/16 in. socket until the ring halves touch or are within 1/16 in. of each other, and no further, because the clamp can break. If it won't close that far, Jandy says not to run the filter and to call a technician. Check the clamp after the first week, and at least once a month after that. The threaded rod and retainer are R0357500.
Live pricing arrives when the retailer programs are approved.
Jandy calls the gauge the primary indicator of how the filter is running. Check the gauge and air release assembly for air or water leaks at least once a week. After coating the grids, turn the bezel so its Clean arrow lines up with the needle; the Dirty arrow then marks 10 to 12 psi higher. The whole gauge and air release assembly is R0357200.
Live pricing arrives when the retailer programs are approved.
Jandy DEV D.E. Filter manuals and documentation
Hosted by the manufacturer. These open on Jandy’s own servers, so they stay current.
- DEV filters installation and operation manual (H0295200 Rev. F, 2024)manual
- Fluidra 2026 product catalog, DEV specifications and parts list (page 59)diagram
- DEV filter brochure (02958_SL)spec
- DEV series specification sheet (SA6260, 2011)spec
- DEV product pagespec
- Jandy limited warranty, USA and Canada (H0333803)spec
Jandy DEV D.E. Filter warranty
1 year parts, None labor
One year from the date of retail purchase under Jandy's limited warranty, which lists no exception for filters. It pays for the replacement product or part only: labor and transportation are excluded. It doesn't apply to a filter bought through the internet or any e-commerce platform; Jandy excepts only valves under 3 in., parts and accessories from that rule, so replacement grids bought online are still covered. The filter has to be installed and serviced by a licensed pool contractor where the jurisdiction requires one, or otherwise by an experienced pool professional, and the DEV manual says so on its cover. Coverage is for the first retail purchaser, doesn't transfer, and ends if the filter is moved. Purchased replacement parts get 90 days. The manual adds that water above 105°F voids the warranty, and that improper installation or operation may.
Manufacturer’s termsJandy DEV D.E. Filter complete parts list
Every part on the manufacturer’s exploded diagram, in their numbering. Marked rows are the ones covered above with a symptom and a diagnosis.
38 parts
| No. | Part | Description | Note |
|---|---|---|---|
| 1 | R0357100 | Handle assembly with hardware, set of 2 | |
| 2 | R0359900 | Handle hardware, set of 4 | |
| 3 | R0357200 | Gauge and air release assembly | |
| 4 | R0359600 | Pressure gauge what goes wrong | |
| 5 | R0552000 | Tank adapter with o-ring | |
| 6 | R0357300 | Tank lid | DEV60 |
| 6 | R0554700 | Tank lid | DEV48 |
| 7 | R0359700 | Top spacer for D.E. grids | |
| 8 | R0405100 | Spacer, DEV48 and DEV60 | |
| 9 | R0358700 | Breather tube assembly | |
| 10 | R0359000 | Manifold assembly what goes wrong | |
| 11 | R0359300 | Tie rod with knob and lock nuts | DEV60 |
| 11 | R0554800 | Tie rod with knob and lock nuts | DEV48 |
| 12 | R0357400 | Tank clamp ring with knob assembly what goes wrong | |
| 13 | R0357500 | Clamp ring threaded rod and retainer | |
| 14 | R0357800 | Tank o-ring what goes wrong | |
| 15 | R0358100 | Outlet tube and elbow assembly with o-rings | DEV60, per the manual; not in Fluidra's 2026 catalog |
| 15 | R0555100 | Outlet tube and elbow assembly with o-rings | DEV48 in the manual; the only number in Fluidra's catalog |
| 15A | R0792000 | Outlet tube o-ring | In Fluidra's catalog only |
| 16 | R0358400 | Inlet elbow with o-ring | |
| 17 | R0359500 | D.E. grid support | |
| 18 | R0359100 | D.E. grid, full size | DEV60; 7 required |
| 18 | R0555000 | D.E. grid, full size what goes wrong | DEV48; 7 required |
| 19 | R0359200 | D.E. grid, short span | DEV60; 1 required |
| 19 | R0554900 | D.E. grid, short span | DEV48; 1 required |
| 20 | R0359400 | Tie rod knob | |
| 21 | R0405200 | Retaining ring | |
| 22 | R0358000 | O-ring replacement kit what goes wrong | Not shown; excludes the tank o-ring, per Fluidra's catalog |
| 23 | R0466500 | Bottom assembly, universal unions | |
| 24 | R0465600 | Bulkhead assembly with o-ring | R0358200 before 2007 |
| 25 | R0465500 | Anchor bracket kit, set of 4 | |
| 26 | R0461800 | Universal half unions and drain plug | Set of 4 in the manual, 2-pack in Fluidra's catalog |
| 27 | R0442600 | Complete set of grids, 7 full-size and 1 short span | DEV60 |
| 28 | R0442700 | Complete set of grids, 7 full-size and 1 short span | DEV48 |
| 29 | R0522900 | Universal half union, 1-pack | |
| 30 | R0523000 | Drain cap assembly | |
| 31 | R0501300 | Complete grid assembly | DEV48 and DEL48 |
| 32 | R0501400 | Complete grid assembly | DEV60 and DEL60 |