Hayward · Booster Pump
Hayward Booster Pump 300
Hayward's booster pump for pressure cleaners: the plumbing rules around heaters and solar, the timer offsets, and a manual written for its previous motor.
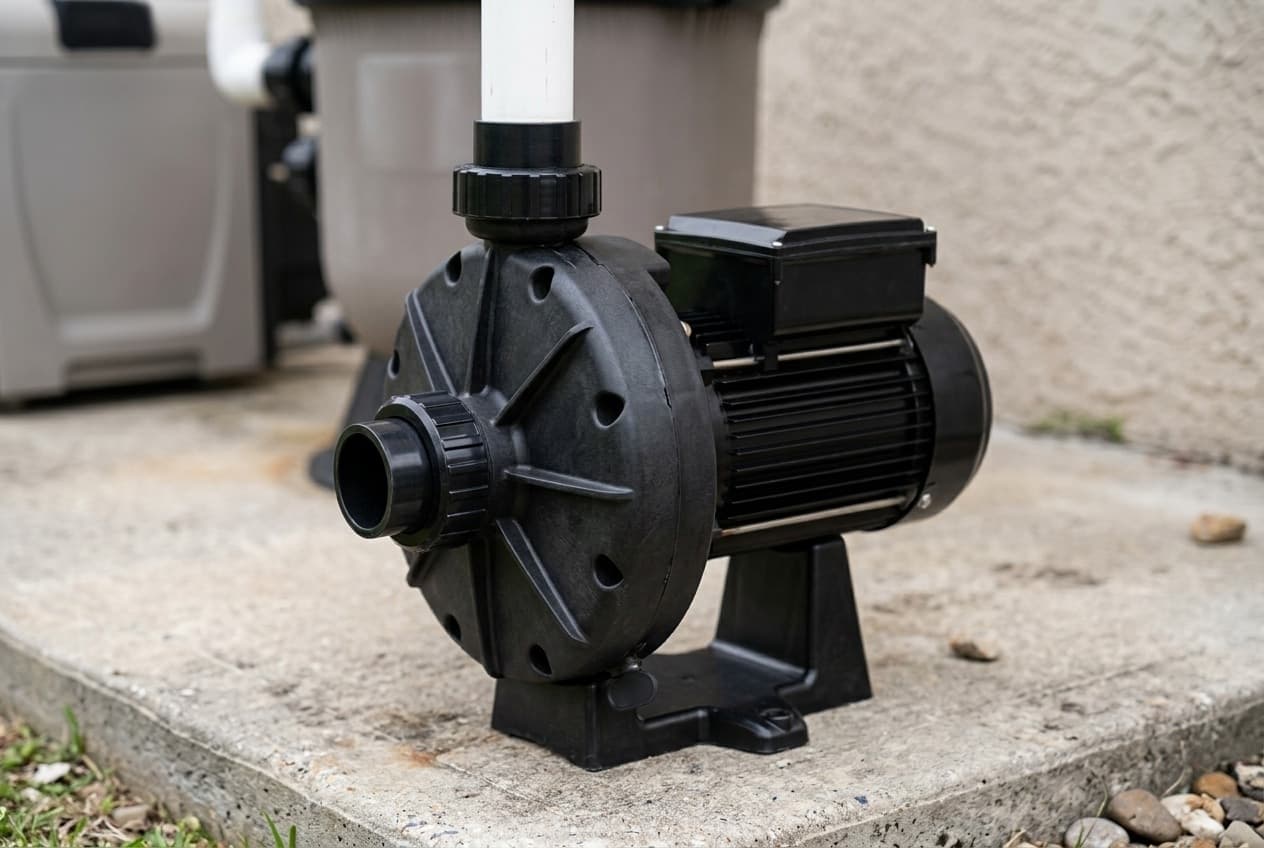
The Booster Pump 300 is Hayward's pump for pressure-side cleaners: a small, single-speed pump that takes water from the filtration system and drives the cleaner. It comes as the HSP30060 from pool stores and the W36060 online. Both have a TEFC motor rated at 1.1 total horsepower, and run on 115 or 208 to 230 volts. The manual for Hayward's TracJet names this pump, or an equivalent, as the one to use.
The owner's manual Hayward links for both is the 2016 manual for the model 6060, which it replaced. Most of what follows comes from that manual, and where the newer pump differs, this page says so.
What it needs
- A pressure cleaner that needs a booster. Hayward says it suits all of them.
- At least 8 GPM from the filtration system. It isn't self-priming, so it relies on the filter pump for its water.
- Its own circuit wiring. The pump has to be permanently connected, on a GFCI, with no extension cord.
- An in-ground, permanently installed pool. Hayward's pumps aren't for storable pools.
Where it goes, and how it's plumbed
Placement. It's built for outdoors, but Hayward strongly advises shade. Pick a well-drained spot that won't flood, never a damp or unventilated one. Bolt it to a level concrete slab or other rigid base, with its inlet as close to the pool's water level as possible.
Pipe. Hayward recommends 1-1/2 inch pipe with the union fittings supplied. Use the 3/4 inch hose barb adapters when replacing a booster that was plumbed with flexible hose. Keep the suction line short and direct, with as few fittings as possible, and at least five pipe diameters of straight pipe before the pump inlet. Don't tee the inlet into the top of a horizontal pipe.
Below water level, put a ball valve between the booster and the filtration system so it can be serviced. Make sure any valves around it are open before it runs.
After a heater. Keep at least 3 feet of pipe between the heater and the booster's inlet. Never connect the inlet into the section of heat sink pipe coming straight out of the heater; Hayward says that can damage the pump and void its warranty.
With solar. Put a diverter valve or tee on the return line between the filter and the solar heater, so the booster keeps its water while the panels fill. Don't install it on a pipe that stops flowing when the solar is on, unless an override switch shuts the booster off while the panels purge air.
Wiring, and the timer
Match the supply to the motor's nameplate voltage, and keep the voltage at the motor within 10% of it. Ground and bond the pump. Hayward calls for solid copper bonding wire, No. 8 AWG or larger, to the pool structure.
Timer offsets. Hayward recommends a separate time clock for the booster, set so the cleaner starts at least half an hour after the filtration system and stops at least half an hour before it. If power to the clocks is interrupted, reset them. For the first 30 days, Hayward recommends a longer than normal cleaning cycle. An automation system does the same job; follow its maker's guide.
Starting and running it
- Start the filtration pump first, and connect the cleaner. Hayward says not to run the booster without a pressure cleaner connected.
- Open every valve at the booster's inlet and outlet, and set the filtration valves so they don't starve it.
- Check for leaks. If there are any, turn everything off and wait for the water to stop before going near the equipment.
- Stand at least 10 feet away and start the booster.
Never run it dry. Water cools and lubricates the shaft seal. Running dry can damage the seal and cause leaks and flooding, and it voids the warranty. When the filter pump has to go off, turn the booster off first.
Don't add chemicals just ahead of the pump's suction. Undiluted chemicals damage it, and that voids the warranty too.
Replacing an old booster with this one means resetting the cleaner's operating pressure by the cleaner maker's procedure. On a TracJet, that's the wheel speed.
Looking after it
The motor bearings and shaft seal are self-lubricating, so nothing needs oiling. Keep the motor clean and its air vents clear, and don't hose the motor off.
Winterizing. Turn the booster off, then the filter pump, and turn off the power. Take the drain plug out of the seal plate and drain the pump completely, then winterize the pipes. Freezing voids the warranty. Use only propylene glycol as antifreeze. Never blow the lines out with compressed air; use a high-volume blower under 5 PSI. Keep the motor dry and covered in storage, but don't wrap it in plastic, which traps condensation.
When it isn't working
- Motor won't start: check the wiring, relays, breakers and fuses. Turn the motor shaft by hand to see it moves freely, and check the timer or bypass it.
- Motor shuts off: usually low voltage, often from undersized wiring or an extension cord. The thermal overload cuts the motor out before it overheats and restarts it once it cools, and it keeps cycling until the cause is fixed.
- Motor hums but won't start: an impeller jammed with debris. Hayward says to have a qualified professional open the pump.
- Low flow: a clogged suction line, undersized piping, a dirty filter or a partly closed valve, an air leak on the suction side, or a plugged or damaged impeller.
- Noisy: air in the suction side, a restricted suction line, a low pool level or unrestricted returns; loose mounting; debris in the pump housing; or worn motor bearings. Bearings often go because a leaking seal let water in, which is why Hayward says to replace leaking seals at once.
Replacing the shaft seal
Hayward says only qualified people should do this. With the power off:
- Remove the eight screws holding the volute to the seal plate, and slide the motor out, exposing the impeller.
- Take off the motor canopy, hold the shaft with a 7/16 inch wrench on its flats, and unscrew the impeller counterclockwise.
- Remove the four motor bolts with a 9/16 inch wrench, take off the seal plate and the spring seal, and press the old ceramic seat out.
- Clean everything, and lubricate the shaft and seal recess with a mild solution of liquid soap. Press the new ceramic seat in, polished face out.
- Refit the seal plate. Slide the spring seal onto the shaft, black polished face toward the ceramic, and screw the impeller back on clockwise, snug.
- Refit the canopy and slide the motor back into the volute with its o-ring in place and lubricated. Tighten the eight screws alternately and evenly to 70 inch-pounds.
Both seal faces scratch easily, so handle them with care, and wipe them only with a soft cotton cloth.
Warranty and where to buy
The HSP30060 gets 3 years parts and 1 year labor from a pool store, and a Hayward Rewards dealer can extend the labor to 2 years. The W36060 gets 1 year parts, no labor. Seals and o-rings are wear items, covered only for manufacturing defects. Keep the receipt; Hayward's warranty only covers products from Hayward or an authorized seller.
Where Hayward's documents disagree, or are unclear
- Which pump the manual is for. Both product pages link the 2016 manual for the model 6060. It lists an open, non-TEFC 3/4 HP motor, SPX2707Z1B, rated 1.25 total horsepower. The Booster Pump 300 has a TEFC motor rated 1.1.
- Current draw. The only amp figures Hayward publishes are that manual's: 13.3 A at 115 V and 6.9 to 6.8 A at 208 to 230 V, with a 20 A breaker on 115 V and a 10 A breaker on 230 V. They were written for the older motor.
- The W36060's motor. Its product page says TEFC, but its related parts show the open SPX2707Z1B. The HSP30060's page shows the TEFC SPX2707Z1BT, and Hayward's online diagram for both models lists both motors.
- The motor's size. The online parts diagram calls SPX2707Z1BT a 3/4 HP motor. Its own part page calls it 1 HP. The 2026 price schedule lists the W36060 as a 3/4 HP booster, and its product page as 1.1 HP.
- Warranty. The manual says 1 year. The HSP30060 product page says 3 years parts and 1 year labor. The sell sheet mentions a "2-year extended warranty" in one place and "3 years" in its table.
- Electricity savings. The manual says up to 40% less than competing boosters. The sell sheet says up to 35%.
- The W36060's description. It repeats the Booster Pump 300's text, hose kit and 2-year extended warranty included, while its specification table says 1 year parts and lists no hose kit. Its performance curve link opens the Super Pump's curves.
- Part numbering. The manual numbers the seal plate o-ring 5 and the shaft seal 6; the online diagram swaps them. The manual lists one motor bolt, SPX3200Z5; the online diagram lists a 4-pack. The manual mentions "6060UB" hose barb fittings, which appear nowhere in its own parts list.
- The seal. Both the manual and the online diagram give the shaft seal as SPX2700SA. Hayward's website has no page for that number, only for a Viton version, SPX2700SAV, and doesn't say whether one replaces the other.
Which model do you have?
The model number is on the pump label. Everything else in the range is shared — these are the parts that change with it.
| Model | HP | SKU | Channel | Warranty | Motor | Shipping weight | Note |
|---|---|---|---|---|---|---|---|
| HSP30060 | 1.1 THP | HSP30060 | Expert Line, pool stores | 3 years parts, 1 year labor | SPX2707Z1BT | 30 lb | Expert Line, the Booster Pump 300, sold through pool stores and service companies. TEFC motor, 1.1 total HP, hose kit included. Hayward's product page gives it 3 years parts and 1 year labor. |
| W36060 | 1.1 THP | W36060 | Open Line, online and in stores | 1 year parts, no labor | SPX2707Z1BT or SPX2707Z1B; the online diagram lists both | 31 lb | Open Line, approved for online sale. Hayward's product page lists a TEFC motor and 1.1 total HP, the same as the HSP30060, with the same parts diagram, and gives it 1 year parts and no labor. The page's description is the Booster Pump 300's, word for word, including the hose kit and the 2-year extended warranty, neither of which its own specification table mentions. |
Hayward Booster Pump 300 parts, and what goes wrong
Read off the manufacturer’s parts list and checked before it ships. Open a row for what a bad one actually does — or start from the symptom and work down, which is the cheaper order.
What is it doing?
Hayward says shaft seals have to be replaced now and then, from wear or damage, and that all leaking seals should be replaced at once. A leaking seal lets chlorinated water into the motor bearings, where it washes out the grease and the bearings start to whine. Running the pump dry can damage the seal, and it voids the warranty. The seal comes in two parts, a spring seal on the shaft and a ceramic seat in the seal plate, and both polished faces scratch easily. Hayward's troubleshooting also says to fit a new seal whenever the impeller is replaced.
Live pricing arrives when the retailer programs are approved.
For a motor that hums without turning, Hayward's troubleshooting gives one cause, an impeller jammed with debris, and says to have a qualified professional open the pump and clear it. For low flow, after the filter, the suction line and the pipe sizing, the last cause it lists is a plugged, restricted or damaged impeller, replaced along with a new seal assembly. The impeller unscrews counterclockwise from the motor shaft, held with a 7/16 in. wrench on the flats at the shaft's end.
Live pricing arrives when the retailer programs are approved.
Before the motor: check the wiring, relays, breakers and fuses, turn the shaft by hand to see it moves freely, and check or bypass the timer. A motor that cuts out and restarts on its own is its thermal overload tripping. The cause Hayward lists is low voltage, frequently from undersized wiring or an extension cord. The voltage at the motor has to be within 10% of its nameplate rating. Hayward's diagram describes this motor as 3/4 HP; its own part page calls it a 1 HP motor. SPX2707Z1B is the open, non-TEFC 3/4 HP motor in the older manual. A replacement motor carries 1 year.
Live pricing arrives when the retailer programs are approved.
The o-ring between the volute and the seal plate. When the motor goes back into the volute, Hayward says to check it's in place and lubricated, and to replace it if it's damaged. Then tighten the eight volute screws alternately and evenly to 70 inch-pounds.
Live pricing arrives when the retailer programs are approved.
Freezing voids the warranty. To drain the pump, turn the booster off before the filter pump, turn off the power, then take this plug out of the seal plate and let all the water out. It comes out without tools. Use only propylene glycol as antifreeze. Never purge the lines with compressed air; use a high-volume blower under 5 PSI. Don't wrap the pump in plastic for storage.
Live pricing arrives when the retailer programs are approved.
If you are doing the job anyway
Opening the volute for one part is the time to do the others.
Shaft seal replacement
Hayward's seal change separates the volute from the seal plate and takes the impeller off, and it says to inspect the gaskets while everything is apart and to replace the seal plate o-ring if it's damaged.
- Shaft seal assemblySPX2700SA
- Seal plate o-ringAX6060S
Hayward Booster Pump 300 manuals and documentation
Hosted by the manufacturer. These open on Hayward’s own servers, so they stay current.
- Booster pump owner's manual, model 6060 (IS6060 Rev. C, 2016)manual
- Booster Pump 300 sell sheet (LITBP300SS25)spec
- HSP30060 performance curvecurves
- HSP30060 product page — specifications and the interactive parts diagramdiagram
- W36060 product page (Open Line)spec
- Booster Pump 300 line drawing, sidespec
- Hayward 2026 Expert Line warranty termsspec
- Hayward 2026 Open Line warranty termsspec
Hayward Booster Pump 300 warranty
3 years parts, 1 year labor
Three years parts and one year labor on the Expert Line HSP30060, per its product page and Hayward's 2026 Expert Line terms, where a Hayward Rewards dealer can extend the field labor to 2 years. The Open Line W36060 gets one year parts and no labor. Pump seals and o-rings are normal wear items in Hayward's terms, covered for manufacturing defects only, which it says normally show within 30 days of installation. The manual adds what voids coverage: installing against its instructions, running the pump dry, freezing, pouring undiluted chemicals in just ahead of the pump's suction, and connecting its inlet into the 3 feet of pipe leaving a heater. It also excludes negligence and improper use or care, and without proof of purchase it takes the manufacturing date as the purchase date. Hayward's warranty page adds that coverage applies only to products bought from Hayward or an authorized seller, cannot start before the delivery date, and gains 90 days when the product is registered. The manual itself still says one year; it was written for the earlier 6060.
Manufacturer’s termsHayward Booster Pump 300 complete parts list
Every part on the manufacturer’s exploded diagram, in their numbering. Marked rows are the ones covered above with a symptom and a diagnosis.
| No. | Part | Description | Note |
|---|---|---|---|
| 1 | AX6060Z1 | Screw, 1/4 in. Type B x 1-1/4 in. | Set of 10; the volute takes 8 |
| 2 | AX6060A | Pump volute | |
| 3 | AX6060UNPAK | Union connector kit | Union hose connector, union pipe connector, union nut and union o-ring, 2 each |
| 4 | AX6060C | Impeller assembly what goes wrong | |
| 5 | AX6060S | Seal plate o-ring what goes wrong | Item 6 on Hayward's online diagram |
| 6 | SPX2700SA | Shaft seal assembly what goes wrong | Item 5 on Hayward's online diagram |
| 7 | AX6060E | Seal plate assembly | Includes the drain plug and o-ring |
| 8 | SPX4000FG | Drain plug with o-ring what goes wrong | |
| 9 | AX6060G | Motor support | |
| 10 | SPX3200Z5 | Motor bolt | Hayward's online diagram lists the 4-pack, SPX3200Z5PAK4 |
| 10 | SPX3200Z5PAK4 | Motor bolts, 4-pack | |
| 11 | SPX2707Z1BT | Motor, TEFC what goes wrong | HSP30060 and W36060. Hayward's online diagram for both lists this and SPX2707Z1B; the HSP30060 page's related parts show this one |
| 11 | SPX2707Z1B | Motor, 3/4 HP, square flange, open | The motor in the 2016 manual; it replaced SPX2707Z1M. Also in Hayward's online diagram, and the one the W36060 page's related parts show |
| 12 | SPX1495Z1 | Union o-ring | On Hayward's online diagram only |
| — | 6060HKIT | Hose kit | Hose, 2 hose fittings and 4 hose clamps. Optional in the manual. The HSP30060 product page says a 3/4 in. retrofit hose kit is included, without giving its number |
Buy the pump
One retailer for now. More get added here as their programs are approved, and this becomes a comparison rather than a link.